本文工程地址:https://github.com/JinLiGame/Unity3DHotchpotch/tree/master/AssetBundleBaseExample
什么是AssetBundle
- AssetBundle是一个类似于ZIP的资源压缩包,资源包括Models、Textures、Prefabs、Audio clips等,每个不同的平台打包出来的AssetBundle不同。
- AssetBundle彼此之间可以互相依赖引用。
- AssetBundle可放在服务器供客户端下载使用,以减少初始化安装包大小。
如何打包AssetBundle
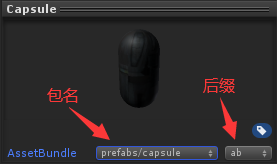
- 选择需要打包的资源,在Inspector视图底部,找到AssetBundle选项,默认是None,如图:
![AssetBundle01]()
注:包名不区分大小写,可以使用路径+包名的形式;后缀可选可不选。Unity会自动把相同标签的资源打包成一个AssetBundle。 - 创建Editor文件夹,新建CreateAssetBundles脚本
1
2
3
4
5
6
7
8
9
10
11
12
13
14
15
16
17
18
19
20
21
22
23
24
25
26
27
28
29
30
31
32
33
34
35
36
37
38
39
40
41
42
43
44
45
46
47
48
49
50
51
52
53
54
55
56
57
58
59
60
61
62
63
64
65
66
67
using System.IO;
using UnityEditor;
using UnityEngine;
public class CreateAssetBundles
{
[MenuItem("Tools/BuildAssetBundles/All")]
static void CreateAllPlatformAssetBundles()
{
CreateStandaloneWindows64AssetBundles();
CreateAndroidAssetBundles();
CreateIOSAssetBundles();
}
[MenuItem("Tools/BuildAssetBundles/StandaloneWindows64")]
static void CreateStandaloneWindows64AssetBundles()
{
string assetBundleDirectory = "AssetBundles/StandaloneWindows64";
ExecuteBuild(assetBundleDirectory, BuildAssetBundleOptions.ChunkBasedCompression, BuildTarget.StandaloneWindows64);
}
[MenuItem("Tools/BuildAssetBundles/Android")]
static void CreateAndroidAssetBundles()
{
string assetBundleDirectory = "AssetBundles/Android";
ExecuteBuild(assetBundleDirectory, BuildAssetBundleOptions.ChunkBasedCompression, BuildTarget.Android);
}
[MenuItem("Tools/BuildAssetBundles/IOS")]
static void CreateIOSAssetBundles()
{
string assetBundleDirectory = "AssetBundles/IOS";
ExecuteBuild(assetBundleDirectory, BuildAssetBundleOptions.ChunkBasedCompression, BuildTarget.iOS);
}
static void ExecuteBuild(string outputPath, BuildAssetBundleOptions assetBundleOptions, BuildTarget targetPlatform)
{
if (string.IsNullOrEmpty(outputPath))
{
Debug.LogError($"Build {targetPlatform.ToString()} Platform AssetBundles Failed, due to outputPath is NULL or Empty.!");
return;
}
try
{
if (Directory.Exists(outputPath))
{
bool isClear = EditorUtility.DisplayDialog("File delete confirmation", "Do you want to delete all files in the directory " + outputPath, "Yes", "No");
if (isClear)
Directory.Delete(outputPath, true);
}
if (!Directory.Exists(outputPath))
{
Directory.CreateDirectory(outputPath);
}
BuildPipeline.BuildAssetBundles(outputPath, assetBundleOptions, targetPlatform);
Debug.Log($"Build {targetPlatform.ToString()} Platform AssetBundles Success!");
}
catch (System.Exception e)
{
Debug.LogException(e);
}
}
}
在BuildPipeline.BuildAssetBundles这个API中,参数outputPath是打包后AssetBundle的存放路径,参数assetBundleOptions是压缩方式,参数targetPlatform是打包的平台。以下是几种压缩方式的区别:
BuildAssetBundleOptions.None使用LZMA算法压缩,压缩的包更小,但是加载时间更长。使用之前需要整体解压。一旦被解压,这个包会使用LZ4重新压缩。使用资源的时候不需要整体解压。在下载的时候可以使LZMA算法,一旦它被下载了之后,它会使用LZ4算法保存到本地上。BuildAssetBundleOptions.UncompressedAssetBundle不压缩,包大,加载快。BuildAssetBundleOptions.ChunkBasedCompression使用LZ4压缩,压缩率没有LZMA高,但是可以加载指定资源而不用解压全部。
注意使用LZ4压缩,可以获得跟不压缩相媲美的加载速度,而且比不压缩文件要小。
然后在菜单栏可以看到以下选项,即可点击打包对应平台的AssetBundle:

上传AssetBundle到服务器
使用NetBox2搭建一个简单的本地服务器,双击AssetBundleBaseExample\Server\NetBox2.exe即可启动本地服务器,可以通过在浏览器中输入
http://localhost/访问index.html,将AssetBundle拷贝到服务器目录下。加载AssetBundle包和AssetBundle包里的资源
AssetBundle.LoadFromFile从本地文件中同步加载AssetBundle1
2
3
4
5
6
7
8
9
10
11
12void LoadFromFileExample()
{
string path = "AssetBundles/StandaloneWindows64/prefabs/capsule.ab";
AssetBundle ab = AssetBundle.LoadFromFile(path);
if (ab == null) return;
GameObject prefab = ab.LoadAsset<GameObject>("Capsule");
if (prefab == null) return;
Instantiate(prefab);
}AssetBundle.LoadFromFileAsync从本地文件中异步加载AssetBundle1
2
3
4
5
6
7
8
9
10
11
12IEnumerator LoadFromFileExampleAsync()
{
string path = "AssetBundles/StandaloneWindows64/prefabs/capsule.ab";
AssetBundleCreateRequest request = AssetBundle.LoadFromFileAsync(path);
yield return request;
AssetBundle ab = request.assetBundle;
if (ab == null) yield break;
//此处省略...
}AssetBundle.LoadFromMemory从内存中同步加载AssetBundle1
2
3
4
5
6
7
8
9
10
11void LoadFromMemoryExample()
{
string path = "AssetBundles/StandaloneWindows64/prefabs/capsule.ab";
//将文件的内容读入一个字节数组
byte[] bytes = File.ReadAllBytes(path);
AssetBundle ab = AssetBundle.LoadFromMemory(bytes);
if (ab == null) return;
//此处省略...
}AssetBundle.LoadFromMemoryAsync从内存中异步加载AssetBundle1
2
3
4
5
6
7
8
9
10
11
12
13
14IEnumerator LoadFromMemoryExampleAsync()
{
string path = "AssetBundles/StandaloneWindows64/prefabs/capsule.ab";
//将文件的内容读入一个字节数组
byte[] bytes = File.ReadAllBytes(path);
AssetBundleCreateRequest request = AssetBundle.LoadFromMemoryAsync(bytes);
yield return request;
AssetBundle ab = request.assetBundle;
if (ab == null) yield break;
//此处省略...
}WWW.LoadFromCacheOrDownload使用WWW加载AssetBundle, 已过时,使用UnityWebRequest代替1
2
3
4
5
6
7
8
9
10
11
12
13
14
15
16
17
18
19
20
21
22
23
24
25IEnumerator LoadFromWWWExample()
{
//在缓存池准备好后再开始加载
while (!Caching.ready)
yield return null;
//本地路径
//string uri = @"file:///E:\Github\Unity3DHotchpotch\AssetBundleBaseExample\AssetBundles\StandaloneWindows64\prefabs\capsule.ab";
//服务器路径
string uri = @"http://localhost/AssetBundles\StandaloneWindows64\prefabs\capsule.ab";
WWW www = WWW.LoadFromCacheOrDownload(uri, 1);
yield return www;
if (!string.IsNullOrEmpty(www.error))
{
Debug.LogError(www.error);
yield break;
}
AssetBundle ab = www.assetBundle;
if (ab == null) yield break;
//此处省略...
}UnityWebRequestAssetBundle.GetAssetBundle使用UnityWebRequest加载AssetBundle1
2
3
4
5
6
7
8
9
10
11
12
13
14
15IEnumerator LoadFromUnityWebRequest()
{
//本地路径
//string uri = @"file:///E:\Github\Unity3DHotchpotch\AssetBundleBaseExample\AssetBundles\StandaloneWindows64\prefabs\capsule.ab";
//服务器路径
string uri = @"http://localhost/AssetBundles\StandaloneWindows64\prefabs\capsule.ab";
UnityWebRequest request = UnityWebRequestAssetBundle.GetAssetBundle(uri);
yield return request.SendWebRequest();
AssetBundle ab = DownloadHandlerAssetBundle.GetContent(request);
if (ab == null) yield break;
//此处省略...
}
AssetBundle卸载
AssetBundle.Unload(true)卸载所有资源,即使有资源被使用着 。切换场景时会自动调用该方法。AssetBundle.Unload(false)卸载所有没用被使用的资源 。
AssetBundle分组策略
- 前面为AssetBundle设置的标签其实就是分组,相同标签的为一个组,Unity官方提供了3种供参考的分组策略:
- 逻辑实体分组:
- 一个UI界面或者所有UI界面一个包
- 一个角色或者所有角色一个包
- 所有的场景所共享的部分一个包
- 类型分组: 比如所有Models一个包、所有Audio clips一个包等。
- 使用分组: 把在某一时间内使用的所有资源打成一个包。可以按照关卡分,一个关卡所需要的所有资源包括角色、贴图、声音等打成一个包。也可以按照场景分,一个场景所需要的资源一个包。
- 逻辑实体分组:
- 原则
- 经常更新的资源与不经常更新的资源拆分离为两个包
- 把需要同时加载的资源放在同一个包
- 把其他包共享的资源放在一个单独的包里面
- 把一些需要同时加载的小资源打包成一个包
- 如果对于同一个资源有两个版本,可以考虑通过后缀来区分
依赖打包和加载
依赖的定义
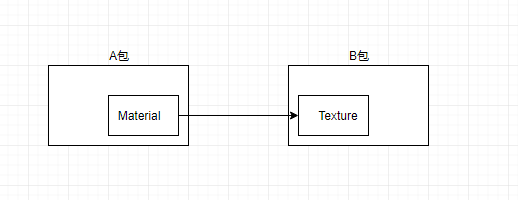
一个AssetBundle包中的资源必须需要另一个AssetBundle包中的资源加载完成后才能正确显示,即前一个包依赖后一个包。如下图所示:

依赖打包
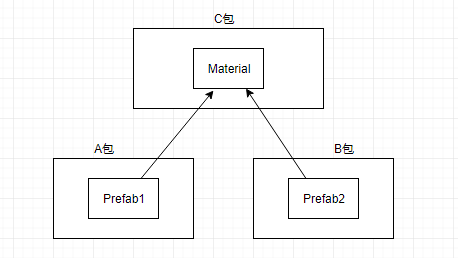
如果两个AssetBundle包A和B都依赖同一个资源,那么这个资源会同时打到这两个包中(这个资源会存在两个),这样就会使得包的总体大小较大;此时就需要将共同依赖的资源打到一个单独的包C中,A和B包就不会将这个资源打进去,而A和B这两个包都会依赖C包。

The Manifest File
打包生成AssetBundle的时候,会生成一个与AssetBundle同名的后缀为.manifest文件,这个文件可以用txt打开,记录了AssetBundle的信息:
1
2
3
4
5
6
7
8
9
10
11
12
13
14
15
16
17
18
19
20
21
22
23
24
25
26
27
28
29ManifestFileVersion: 0
CRC: 1246928136
Hashes:
AssetFileHash:
serializedVersion: 2
Hash: 68ff0b366d24d6e751291e6ecb5bbd02
TypeTreeHash:
serializedVersion: 2
Hash: b3ba791bb7d378b5189369ad535d14a7
HashAppended: 0
ClassTypes:
- Class: 1
Script: {instanceID: 0}
- Class: 4
Script: {instanceID: 0}
- Class: 21
Script: {instanceID: 0}
- Class: 23
Script: {instanceID: 0}
- Class: 33
Script: {instanceID: 0}
- Class: 43
Script: {instanceID: 0}
- Class: 136
Script: {instanceID: 0}
Assets:
- Assets/Prefabs/Capsule.prefab
Dependencies:
- E:/Github/Unity3DHotchpotch/AssetBundleBaseExample/AssetBundles/StandaloneWindows64/common.res在打包AssetBundle的时候,还会生成一个与存放AssetBundle目录同名的.manifest文件,它记录了目录下所有AssetBundle信息:
1
2
3
4
5
6
7
8
9
10
11
12
13
14
15ManifestFileVersion: 0
CRC: 985824211
AssetBundleManifest:
AssetBundleInfos:
Info_0:
Name: prefabs/capsule.ab
Dependencies:
Dependency_0: common.res
Info_1:
Name: prefabs/cylinder.ab
Dependencies:
Dependency_0: common.res
Info_2:
Name: common.res
Dependencies: {}manifest文件会记录AssetBundle包的依赖关系(Dependencies属性),通过加载manifest文件可以处理资源的依赖。
依赖加载
首先,加载与存放AssetBundle的文件夹同名称的那个AssetBundle,然后加载它的AssetBundleManifest对象:
1 | AssetBundle rootAB = AssetBundle.LoadFromFile("AssetBundles/StandaloneWindows64/StandaloneWindows64"); |
然后获取你想加载的AssetBundle所依赖的AssetBundle:manifest.GetAllDependencies(ab.name),加载所有依赖就再加载你想要使用的AssetBundle:
1 | void LoadDependenciesAB(AssetBundle ab) |
文件校验
CRC MD5 SHA1
相同点:CRC、MD5、SHA1都是通过对数据进行计算,来生成一个校验值,该校验值用来校验数据的完整性。
不同点:
算法不同。CRC采用多项式除法,MD5和SHA1使用的是替换、轮转等方法;
校验值的长度不同。CRC校验位的长度跟其多项式有关系,一般为16位或32位;MD5是16个字节(128位);SHA1是20个字节(160位);
校验值的称呼不同。CRC一般叫做CRC值;MD5和SHA1一般叫做哈希值(Hash)或散列值;
安全性不同。这里的安全性是指检错的能力,即数据的错误能通过校验位检测出来。CRC的安全性跟多项式有很大关系,相对于MD5和SHA1要弱很多;MD5的安全性很高,不过大概在04年的时候被山东大学的王小云破解了;SHA1的安全性最高。
效率不同,CRC的计算效率很高;MD5和SHA1比较慢。
用途不同。CRC一般用作通信数据的校验;MD5和SHA1用于安全(Security)领域,比如文件校验、数字签名等。
